
Tinley Park Epoxy Flooring grinds and finishes polished concrete floors in Tinley Park, IL, serving surrounding cities including Country Club Hills, Mokena, Matteson, Midlothian and Hazel Crest. Over more than 20 years of concrete floor work, we have learned that the look of a polished floor is decided by what the grinder exposes, and that is best shown on your own slab before anyone signs a contract.
A polished floor is not a coating. We grind the concrete itself in stages with diamond tooling, harden it with a lithium silicate densifier, and refine the surface until it reflects light, so there is no film on top to peel, blister or yellow.
Our written proposal names the grit sequence, the densifier, any guard or sealer, and the target sheen. It also lists the cracks, patches and old adhesives we found, and what each one will look like in the finished floor, so you know where the surface will be uniform and where it will show its history.
How a Polished Concrete Floor Is Made
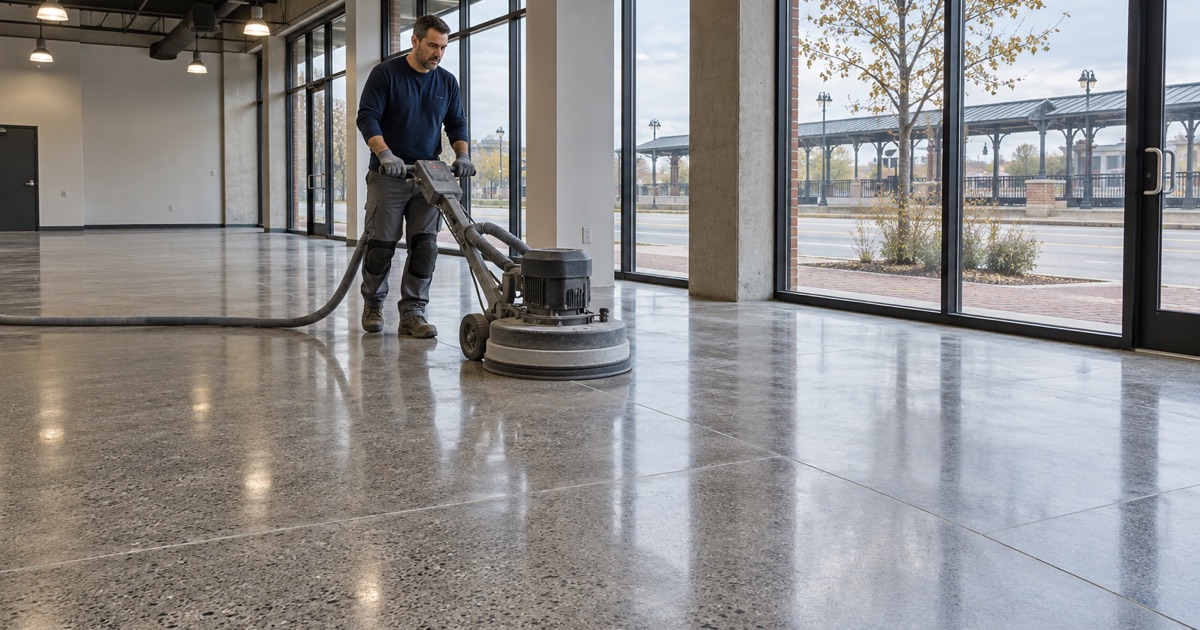
Grinding and Honing in Stages
Polishing starts with coarse metal-bond diamonds that flatten the slab and remove the surface skin, then moves through progressively finer resin-bond diamonds. Each pass removes the scratches left by the last one, and skipping a step leaves swirl marks that show under showroom lighting.
Grinding dust is captured with a vacuum at the machine rather than being swept or washed toward a floor drain. On wet-polish steps, slurry is collected and disposed of properly instead of being rinsed out the door.
Lithium Silicate Densifier
Partway through the grind sequence we apply a lithium silicate densifier, which reacts with the concrete to harden the surface and reduce dusting. That harder surface is what allows the later passes to build shine, and it makes the floor more resistant to abrasion and staining.
Densifier is applied at a measured rate and given time to react before the next grit, rather than flooded on and squeegeed away. Too little leaves soft spots that never take a shine, and too much leaves a white residue that has to be ground off, so the product and rate are written into the scope.
Aggregate Exposure Choices
The depth of the first grind decides how much of the stone in the concrete shows. A light grind leaves a cream finish with little stone visible, a medium grind shows scattered fine aggregate, and a deeper grind exposes the larger stone for a terrazzo-like look.
Because every slab was poured with its own mix, we grind a test area before committing to an exposure level. That small sample tells you more about the finished floor than any photograph from someone else’s project.
Commercial Polished Concrete Floors
Showrooms and Retail Floors
Auto dealers, furniture showrooms and retail stores use polished concrete because it reflects light, cleans easily and has no coating to wear through at the entry. We phase the grinding by section and work nights or weekends where a store has to stay open, keeping dust captured so merchandise stays clean.
Dealerships are a large part of the local economy, and a polished showroom floor shows off the cars under bright lighting without a coating to scuff at the door. Service bays are a different matter, because fluids and winter brine call for a chemical-resistant coated system, and we often pair the two under one scope.
Offices, Clinics and Warehouses
Offices and clinics value polished concrete for low upkeep and a clean look under daily foot traffic. In warehouses and light manufacturing, a densified and polished floor stands up to pallet jacks and dusts far less than bare concrete, and egress aisles can still be marked to the contrasting-color striping the Tinley Park building code requires.
That village amendment to IBC 1014.2 calls for a 44-inch egress aisle striped in a contrasting color for its full length. On a polished floor, the stripe is usually a durable coating or a dyed band ground into the surface, laid out before the final polish so it wears with the floor rather than peeling like tape.
Planning Around Business Hours
Commercial polishing is planned around opening hours, deliveries and staff schedules. We set the sequence in writing so a facility manager knows which areas are out of use each night and when each section returns to service.
Before booking, we confirm the village’s contractor license, bond and insurance rules, since Illinois has no state flooring license and each municipality sets its own. In Tinley Park that means a village contractor license and a 20,000-dollar surety bond, handled before the first machine arrives rather than after an inspector asks.
Residential Polished Concrete Floors
Basements and Lower Levels
Many local homes have a full or partial basement, often the lower level of a split-level, and polished concrete suits those spaces well. With no film on top, moisture moving through a basement slab does not blister the finish, though old paint, mastic and patches must be ground away first.
We coat or polish around sump pits, ejector pits and floor drains, leaving their covers removable. A polished floor is not waterproofing or radon mitigation, and we say so before the job is sold.
Main Floors in Slab Homes and Additions
Slab-on-grade homes, additions and converted spaces can show off polished concrete as a finished floor. The look ranges from a quiet satin cream to a high-gloss exposed aggregate, and rugs and furniture sit on it just as they would on any hard floor.
A slab that was meant to sit under carpet or tile was rarely finished with polishing in mind, so it may show trowel marks, patches or saw cuts once ground. We grind a test area to show you what the slab will look like, and we talk through stains and dyes when the natural color is not what you want. Home jobs over the state threshold also get a written contract and the Illinois consumer-rights pamphlet before any grinding starts.
Garages and Workshops
Polished concrete can be used in a garage or workshop, but it does not shed brine and rock salt the way a coated system does. For a garage that sees winter tires, we often recommend an epoxy or polyaspartic coating instead, and we explain the tradeoff before you choose.
Choosing a Sheen and Protecting It
Matte, Satin and High Gloss
The final grit decides how much the floor reflects, from a low-sheen matte to a mirror-like high gloss. Higher gloss looks striking but shows dust and scuffs more readily, while satin finishes hide daily wear in busy rooms and entries.
Lighting matters as much as grit. A showroom under bright fixtures looks best at a higher gloss, while a basement family room with low light and lots of foot traffic often looks better and stays cleaner-looking at a satin finish, so we review both before choosing the last pass.
Guards, Sealers and Stain Resistance
After the final polish we can apply a penetrating guard or sealer that adds stain resistance without forming a thick film. It helps against oil, coffee and food spills, though no polished floor is completely stainproof and quick cleanup still matters.
Repairs, Cracks and Joint Fill
Cracks and joints are filled before polishing with a color-matched filler where possible. Fills still show in the finished floor, and we describe that honestly in the scope rather than promising an invisible repair.
When a slab has heaved, settled or broken into loose pieces, polishing will not fix it and can make the damage more visible. We say so plainly and recommend repair or replacement first, because a polished floor shows the true condition of the concrete more than any coating would.
Our Step-by-Step Polished Concrete Floors Process
Step 1: Slab Review and Test Area
We inspect the slab, map cracks and old coatings, and grind a test area so you can see the aggregate exposure and color before committing. The written scope then records the grit sequence and target sheen.
Step 2: Coarse Grinding and Repair
Metal-bond diamonds flatten the floor and set the exposure level. Cracks and joints are filled at this stage, while the surface is still open.
Step 3: Densifying and Honing
The lithium silicate densifier hardens the surface and is given time to react. Resin-bond diamonds then refine it pass by pass, each one removing the scratches of the last.
Step 4: Polishing and Guard
The final grits bring the floor to the chosen sheen, and a guard or sealer is applied if specified. You receive written care instructions for the finish.
- 20+ Years Coating Floors
- Moisture Test in Every Scope
- Free Written Estimates